![[BEYOND TV SAFETY]](/file/35716/EX CD Rom.iso/issue3_1/images/section_tvsafety.gif)
 |

—by Scott Frazier
One of the strongest things about anime
is the camera work. A director should know as much as
possible about how animation and live action cameras are
used so that (s)he can create the best work possible.
I have attempted to condense the essentials of
anime camera work here. I have tried to put in
the English terms when I knew what they are but I do not
know how accurate they are. Sometimes the same word is
used a little differently. I refer to only traditional
film-based camera here and will cover digital in the
future.
Throughout this overview I shall use this cut,
pretty common anime stuff. 2D and 3D
representations of the same thing are mixed here but the
base ideas are exactly the same.

The red guy is our hero,
Joe. The green guy is our villain, Big Verdo and the
yellow figure is our heroine, Tawny the catgirl. Big Verdo has kidnapped Tawny for
nefarious reasons and Joe has pursued them to the Planet
of Ancient Stuff.
Notes
A great difference in the way that anime
camerawork is done from the West is that the Western
animators specify all the camerawork down to the last
frame. The Japanese animator specifies the framing (what
the camera sees) where the movement starts and stops by
drawing the framing boxes onto the layout in red pencil.
The enshutsu often changes this a little bit to
make sure the move fits his/her image better. (You never
really know exactly what the cut will look like until you
have the finished materials in your hands. This is the
same as when a cinematographer changes camera position
and lighting to better fit the image he and the director
want.)
When the camera operator gets the cut, he
lines up the cut elements according to the first framing,
records all the settings of the various measuring devices
on the camera stand then repositions everything to the
second framing. Sometimes the frame is smaller or larger
so he makes sure everything is right and records the
second set of coordinates and settings. All he has to do
then is divide the distance covered (and frame size
change) by how many frames the move should be and follow
the numbers. Diagonal movements are indicated by an arrow
on the layout and the camera operator approximates the
degree.
There is no need to specify how many
inches/centimeters and degrees things move if the camera
people know what they are doing. (If they don't know what
they are doing then why are you using them?!) A very
respected director once told me to cut most of the
numbers off some time sheets I was specifying camera work
on.
|
"Indicate what you want but let them [the
camera operators] take care of the details. They know
more about camera than you do so it will look better if
you let them take care of it." |
|
The Japanese refer to an animation scene as a cut.
Most anime is "shot on
3's" which basically means that there is one
cel used for every 3 frames of film when things are
moving. The cut might have one cel for a character's body
on the bottom level (the A level in anime
camera) and 3 different cels for the mouth on the second
level (B) and 4 or 5 cels for the
blinking eyes on the uppermost level. (C
in this case). (Up to 5 cels can be stacked before there
is a very noticeable change in the color of the lowermost
cels.) When the mouth is moving one B cel will be used
for every 3 frames shot.
Although using more cels (shooting on 2's or
1's) should improve the smoothness and overall feeling of
the animation, if the inbetweens and keys are of
low quality to start with there will be no improvement.
Good animators and directors can make a few cels go a
long way but poor animators and weak directors can make
trash any number of cels thus a greater cel count does
not necessarily indicate better animation. (I have heard
people praise shows with low cels counts and lots of
camera work as being "well animated".)
Frame rate for film is 24 frames per second,
PAL video (Europe, Asia, etc.) is 25 fps and NTSC video
(US, Japan, etc.) is 30 fps. (OK, it's actually 29.97.
Like that matters to most people.) Most anime is
still shot on film and transferred to videotape in an
editing studio through a process referred to as telecine.
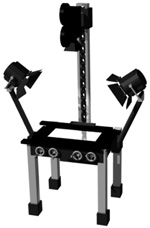
The Camera
The typical Japanese animation camera is a 16mm film camera
which can shoot a single frame at a time fixed to
a 3 meter rail with a chain to allow the operator
to move it up and down. The camera can only move
in one direction - vertically.
Any horizontal or movement must be done by moving
the elements a little bit, shooting a frame,
moving the elements another little bit, and so
on. The camera "table" or stand usually
has multiple moving sections that the camera
operators can fix the various elements to and
move with cranks. Each of the crank wheels has a
measuring device that allows the camera operator
to move things without having to measure again
for every frame. The center section is usually
cut out and has a plate of frosted glass so that
a light can be shown from below for backlighting effects.
The
camera operators normally work
in teams of two, one reading the time sheet and
controlling the shutter (a foot pedal) and the other
setting up and moving the various elements.
The standard anime frame size is
called a 100 frame and is
equivalent to a 9 field in Western
animation. The Japanese don't pay as much attention to
the field chart as their Western counterparts do so the
exact meaning of "100 frame" is now
unknown.
In any cut there are two regions that the
animators, director and camera operators must be aware
of:
TV Safety is a region which
will appear on film but will be cut off by the warping at
the sides of a TV tube. The area outside TV Safety is a
veritable Twilight Zone used for notes, comments and
strange little sketches. (Thus the name of this column.)
Title Safety is the area
inside which all titles (and other text) need to be
inside in order to be read clearly on any TV.
 |
|